I think that a beautiful Maths proof, like a folk tale, should be told and retold.
In this post, I’ll be retelling a simple proof for Pythagoras’s Theorem ![]() , first shown to me by my Maths Professor Burkard Polster of Mathologer fame.
, first shown to me by my Maths Professor Burkard Polster of Mathologer fame.
Even though most of us remember Pythagoras’s Theorem (even vaguely) from high school, typically we never have the opportunity to work through a proof for it. It’s such a shame because of how interesting and simple it can be.
I’d be remiss if I didn’t briefly mention that this is far, far from the only proof for Pythagoras’s Theorem. In fact, Pythagorean Theorem proofs have a long and interesting history in and of themselves, with hundreds of published proofs and many books discussing just them.
For anyone who hasn’t seen this before, I hope this is an easy insight into the elegant and mind shifting world of Pure Mathematics and Maths Proofs. If this is your bread and butter, I hope you enjoy the retelling with me, and please let me know if I did it justice!
Which one’s Pythagoras’s Theorem Again?
So that we’re all on the same page, Pythagoras’s Theorem is the relationship:
![]()
Where ![]() ,
, ![]() and
and ![]() are lengths of a right angle triangle.
are lengths of a right angle triangle. ![]() and
and ![]() are the shorter sides and
are the shorter sides and ![]() is the hypotenuse, the longest side.
is the hypotenuse, the longest side.
As well as having deeper mathematical consequences, Pythagoras’s Theorem allows us to easily calculate the length of any side of a right angle triangle, when we know the length of the other two sides.
Proof for Pythagoras’s Theorem
Step 1: Define our Right Angle Triangle
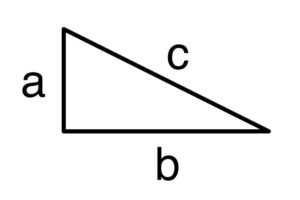
To begin our proof, we start with a right angle triangle of side lengths ![]() ,
, ![]() and
and ![]() .
. ![]() is the hypotenuse, the longest side.
is the hypotenuse, the longest side.
Note: We haven’t actually defined the lengths of any of these sides. This is intentional and will be important at the end of our proof.
Step 2: Arrange 4 of Our Right Angle Triangles as Follows
We take 4 copies of our Right Angle Triangle and arrange them in the slightly funny shape bellow. Going forward I’ll call this the 4 Triangle Arrangement.
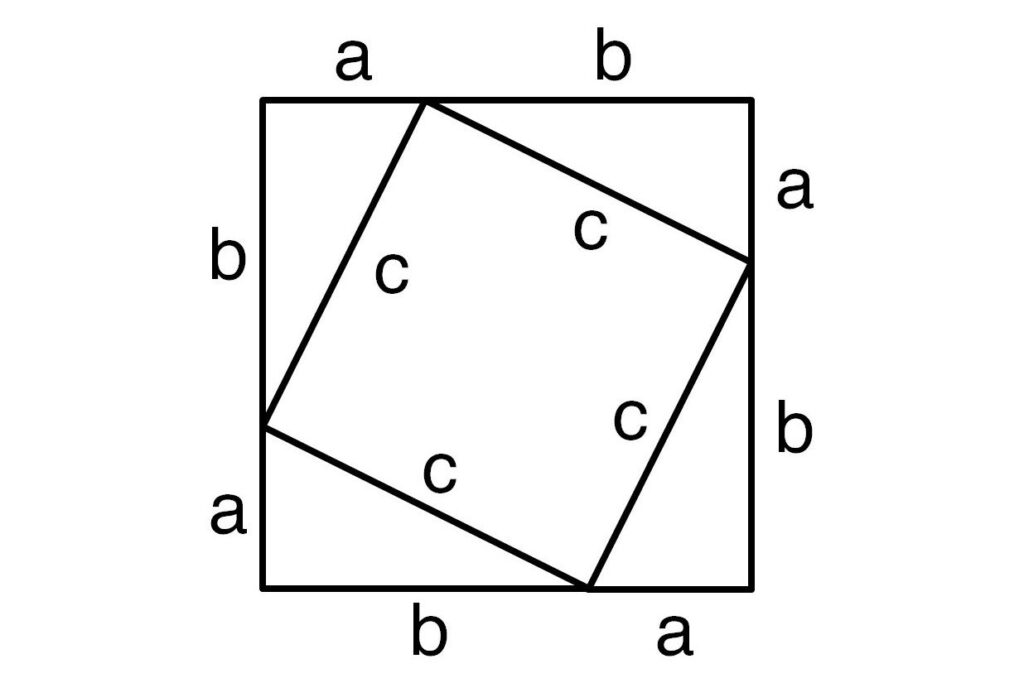
This step is the great insight of the proof. It won’t be immediately obvious why we do this, but I hope that over the next few steps you’ll join me for a eureka moment, where it all makes sense.
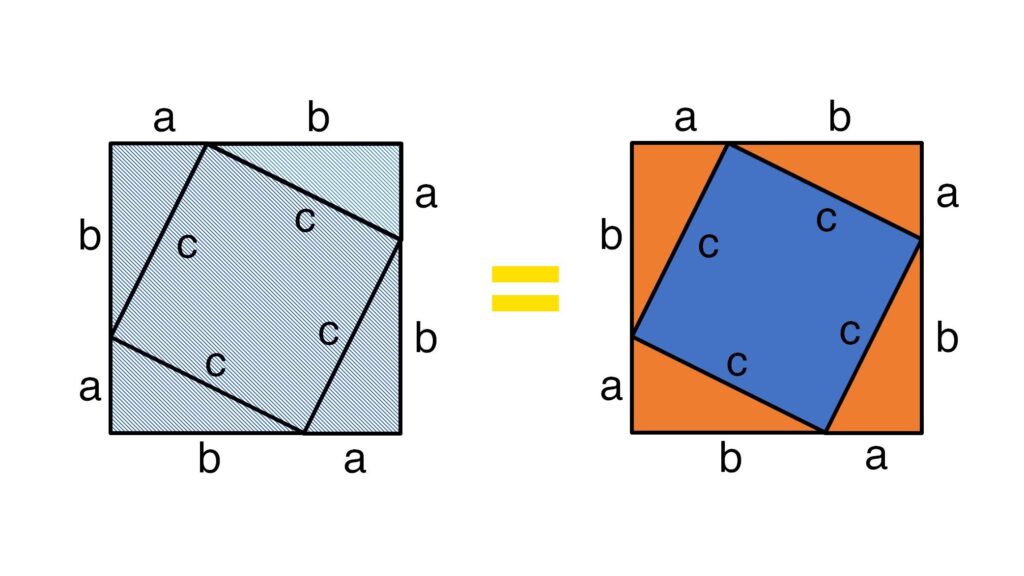
Now consider for a moment, how would you calculate the area of our 4 Triangle Arrangement?
Step 3: First Method to Calculate Area, One Big Square
One way to calculate the area of our 4 Triangle Arrangement is to look at it as one large square.
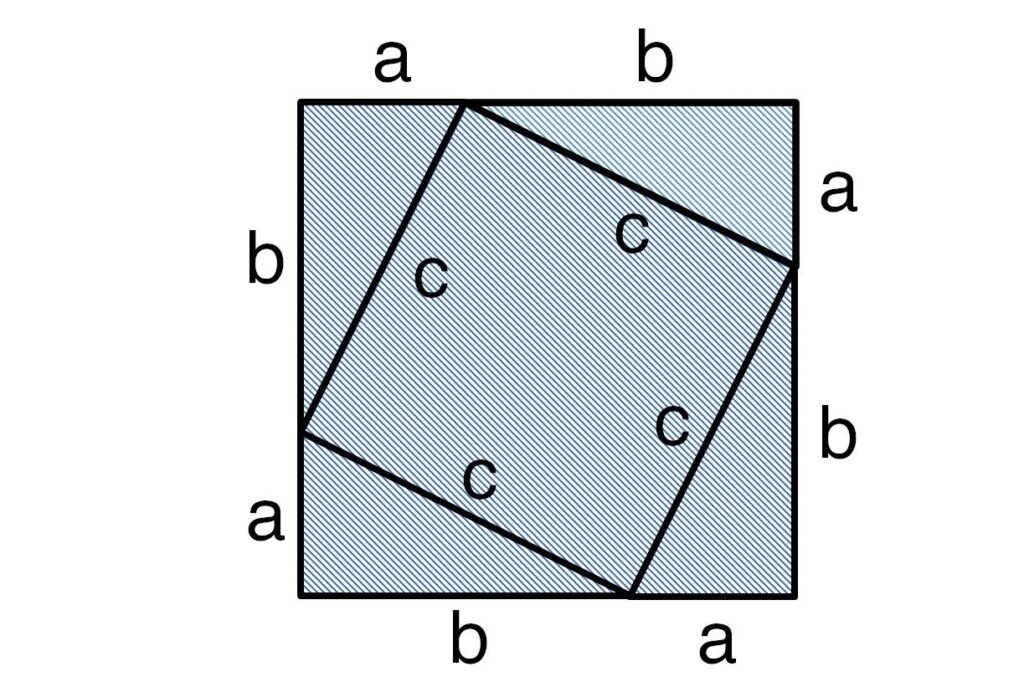
As we know, to find the area of a square, we times its side length by itself. In this case, the side length is equal to ![]() (as you see from in figure 3), therefore:
(as you see from in figure 3), therefore:
![]()
(1) ![]()
Step 4: Second Method to Calculate Area, 5 Smaller Shapes
Looking at our 4 Triangle Arrangement again, we can also think of it as 4 triangles around the edge plus the square in the middle.
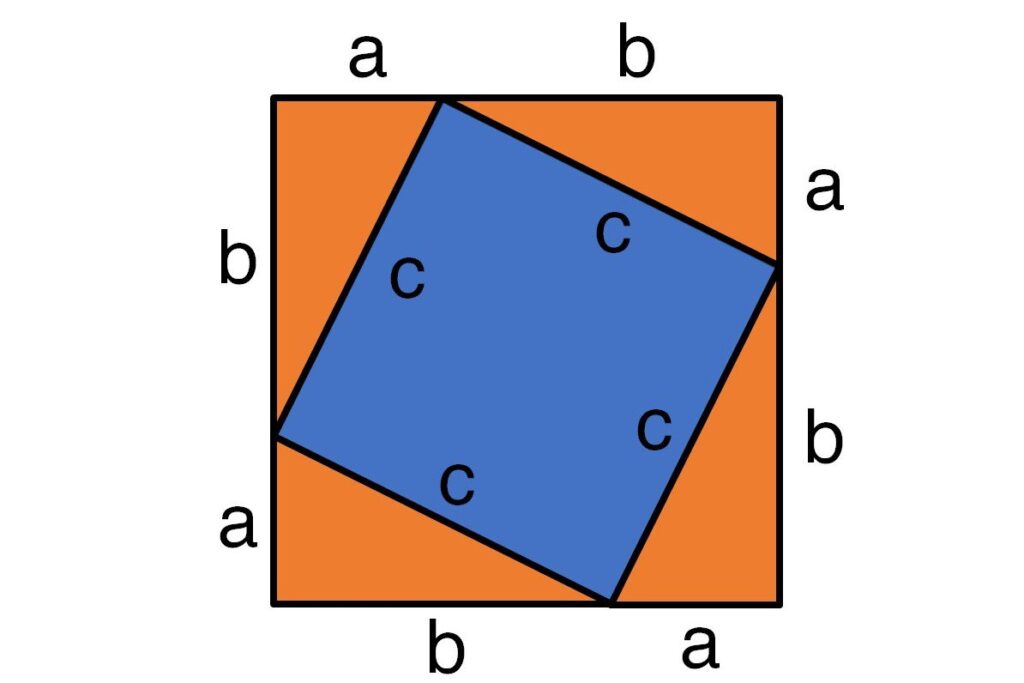
With this in mind, we can work out the total area of the 4 Triangle Arrangement by adding the area of each of these 5 shapes (the 4 outer triangles plus the square in the middle):
![]()
Rearranging
![]()
![]()
Adding these together we get
(2) ![]()
Step 5: Equating Our Two Calculations for Area
In Steps 3 and 4, we calculated the area of the 4 Triangle Arrangement in two different ways, equations ![]() and
and ![]() . But clearly these areas are equal, therefore equations
. But clearly these areas are equal, therefore equations ![]() and
and ![]() must be equal.
must be equal.
For the final step of the proof we equate ![]() and
and ![]() as follows:
as follows:
![]()
![]()
Rearranging
![]()
But isn’t that Pythagoras’s Theorem?
Absolutely! But what does that mean?
Step 6: But what does that mean?
Think back to Step 1 where we defined ![]() ,
, ![]() and
and ![]() . These are the sides of a right angle triangle, but importantly we never defined their lengths.
. These are the sides of a right angle triangle, but importantly we never defined their lengths.
This means that we have shown, through the steps we just worked through, that for any right angle triangle the relationship holds:
![]()
Or put even more simply, we have proven Pythagoras’s Theorem!
And now for the best part, with our work done we get to draw one of these.
❒
That box means QED, or the proof is complete.
Closing Thoughts
Thanks for joining me on this journey. I was excited to try something new with this post and I’m really happy with how it’s turned out. I hope that was even a little bit as fun to read as it was to write.
As always if you have any comments or questions I’d love to hear from you, please get in touch!
